 Save Pin
 I discovered the magic of a properly arranged pickled vegetable platter during a late summer visit to a farmers market in Portland, where a small vendor had arranged jewel-toned vegetables in perfect rows under the afternoon sun. The way the light caught the brine, the way each color told its own story—I knew right then I had to recreate that moment in my own kitchen. What started as an attempt to preserve the season's bounty became something far more meaningful: a ritual of transformation that turned simple vegetables into something worthy of a celebration.
I'll never forget the first time I served this feast to friends who were all swearing off processed foods. The look on their faces when they realized something so colorful and crunchy and satisfying was just vegetables, salt, and time—that's when I understood why pickling has survived for thousands of years. It's not just preservation; it's a small act of magic that happens in glass jars on your refrigerator shelf.
Ingredients
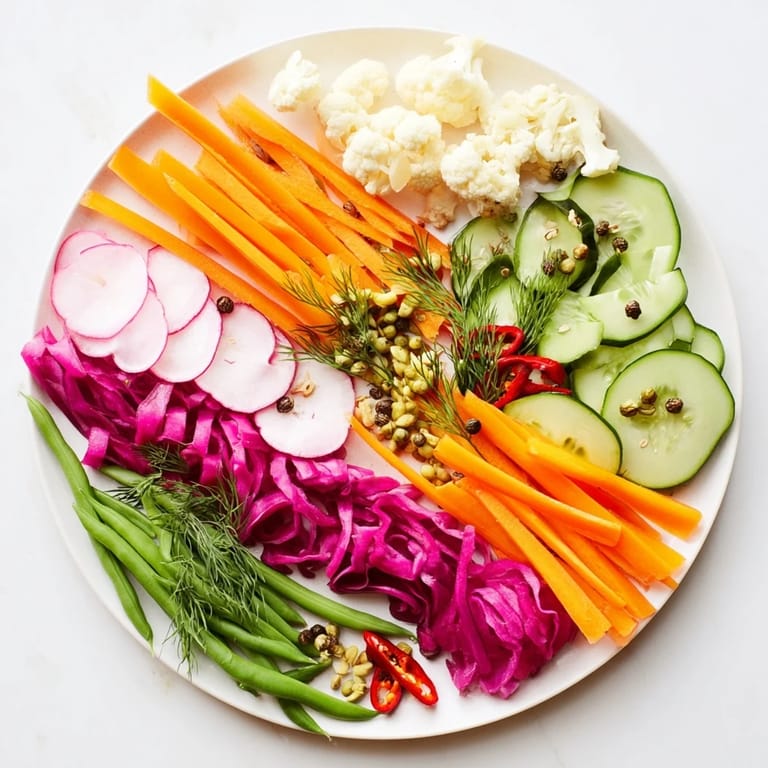
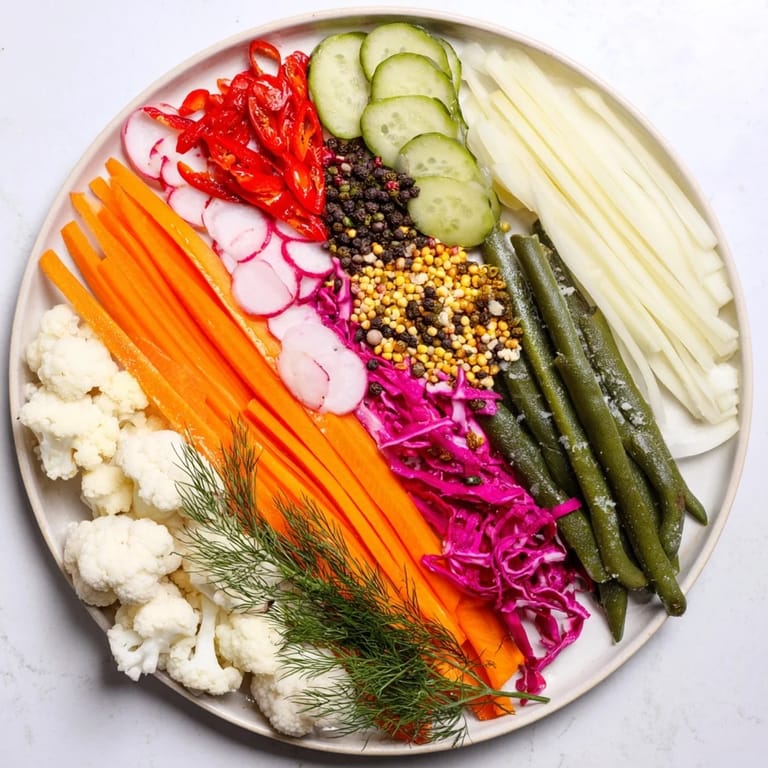
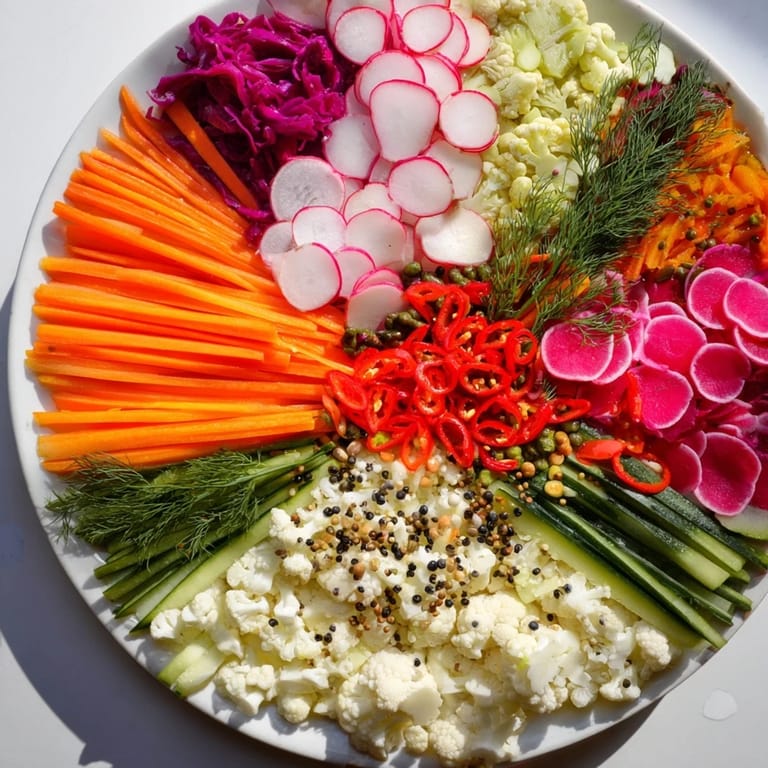
- Carrots, julienned (1 cup): The sweetness here becomes mellow and sophisticated as they pickle, and julienning them thin means they'll soften just enough to give way between your teeth without losing their snap
- Cucumber, sliced (1 cup): Choose smaller, firmer cucumbers if you can—they hold their texture better than the watery varieties and won't turn mushy even after days in the brine
- Radishes, thinly sliced (1 cup): These are the spicy surprise that makes people pause and ask what they just ate; their peppery bite mellows beautifully but never completely disappears
- Red cabbage, shredded (1 cup): Watch how it bleeds its burgundy color into the brine—that's not a flaw, that's the proof that real transformation is happening
- Cauliflower florets (1 cup): These little trees hold onto their crunch like nothing else, and they absorb the brine's flavors while staying firm
- Green beans, trimmed (1 cup): Look for thinner beans; they'll pickle more evenly and stay tender without falling apart
- White vinegar (2 cups): The backbone of your brine—it's sharp and clean, letting the vegetables shine without overwhelming them
- Water (2 cups): This dilutes the vinegar just enough so the vegetables stay crisp instead of becoming vinegary leather
- Sugar (2 tbsp): A small amount that balances the acidity and rounds out the flavor without making anything taste sweet
- Kosher salt (2 tbsp): The seasoning that makes everything taste like itself, only better
- Garlic cloves, sliced (2): Slice them thin so they're not overwhelming, and watch how they transform from sharp and biting to mellowed and sweet
- Mustard seeds (1 tbsp): These tiny spheres stay firm and pop between your teeth, adding a subtle warmth
- Coriander seeds (1 tbsp): A citrusy warmth that ties everything together in a way that's hard to name but impossible to miss
- Black peppercorns (1 tsp): Whole peppercorns release their flavor slowly, giving you little bursts of pepper throughout the dish
- Bay leaves (2): One is pure tradition; two give you a gentle herbal base that supports everything else
- Fresh dill sprigs (3): The green note that makes your kitchen smell like a European pickle shop—use fresh, never dried
- Red chili, sliced (1 small, optional): If you want heat, this is where it comes from, but it's restrained and builds slowly on your palate
- Kimchi (1 cup, optional): The fermented shortcut for those days when you want the complexity of fermentation without the waiting
- Sauerkraut (1 cup, optional): Another fermented friend that brings earthy depth to your spread
Tired of Takeout? 🥡
Get 10 meals you can make faster than delivery arrives. Seriously.
One email. No spam. Unsubscribe anytime.
Instructions
- Prepare Your Canvas:
- Wash all your vegetables under cool running water and pat them completely dry—water clinging to them will dilute your brine. Now comes the part that takes patience: julienne your carrots with a knife or mandoline, slice your cucumbers and radishes paper-thin, shred your cabbage into ribbons that catch the light, break your cauliflower into small, even florets, and trim your green beans. As you cut, try to keep everything roughly the same size; they'll cook—or in this case, pickle—more evenly that way, and they'll look stunning when arranged.
- Build Your Brine:
- Pour your white vinegar and water into a saucepan and set it over medium-high heat. Add your sugar and kosher salt, and stir gently as the liquid warms. You're looking for the moment when the salt crystals completely dissolve and the sugar disappears into the clear liquid. Bring it to a gentle boil—you'll see the first small bubbles breaking the surface—then remove it from the heat immediately. Don't let it boil hard; this isn't about cooking anything, it's about infusing. Let it cool for just a few minutes while you move on to the next step.
- Layer with Intention:
- Get your clean glass jars or bowls ready—they need to be very clean, preferably hot or freshly washed. Now here's where you get to be an artist: pack your vegetables into the jars in groups, keeping like colors and shapes together. This isn't just about aesthetics (though it absolutely is); it also helps them pickle evenly because similar vegetables need similar amounts of time. As you pack, think of it like building a small garden—carrots together, cucumbers together, radishes making a stripe of pink and white. Leave just enough room at the top for your aromatics and the brine.
- Season and Soak:
- Distribute your sliced garlic, mustard seeds, coriander seeds, black peppercorns, bay leaves, fresh dill sprigs, and sliced chili (if you're using it) among the jars. Don't overthink this; just make sure each jar gets a little bit of everything so the flavors are balanced. Now carefully pour your still-warm brine over everything, tilting your jars slightly so the liquid reaches every corner. You want every vegetable fully submerged—anything poking above the brine will turn soft and dark, and you don't want that. Use a small spoon to press things down gently if needed.
- The Waiting Game:
- Seal your jars or cover your bowls and let them cool completely to room temperature on the counter. This takes about an hour, and I promise you'll be tempted to open one and taste it before it's ready. Resist. Once cooled, move them to the refrigerator. Here's what happens next: after 12 hours, you'll have quick pickles—crisp, bright, still faintly crunchy. After 24 hours, the flavors deepen and become more rounded. After 48 hours, you have something complex and sophisticated that tastes like it's been waiting for you all along.
- For the Fermented Route (If You're Brave):
- If you want true fermented vegetables instead, make a simpler brine: dissolve 20 grams of salt in 1 liter of water—that's your 2% ratio. Pack your vegetables the same way, pour the brine over them, cover loosely (fermentation needs air), and leave them on your counter at room temperature. Each day, check them. You'll see bubbles, maybe some white film on top (that's normal and good—it's called kahm yeast), and the vegetables will slowly become softer and more complex. After 5 to 7 days, taste one. If it's sour and funky in a way that makes you happy, you're done. If you want it funkier, keep going. This is less precise than quick pickling, and that's the whole point.
- The Grand Presentation:
- When you're ready to serve, arrange your pickled and fermented vegetables on a large board or platter. You can do this formally—neat rows and grids that look like a still life painting—or you can do it casually with small jars clustered together. Either way, let people see the colors. Let them reach in with their hands. This is meant to be touched and explored and enjoyed together.
 Save Pin
 There was a moment—it must have been three days into my first attempt at pickling—when I opened my refrigerator and the smell hit me before I even saw the jars. It was sharp and vinegary and herbaceous all at once, and I realized that what I'd made wasn't just food anymore; it was proof that I could transform something ordinary into something worth keeping, worth sharing, worth returning to again and again.
The Art of Arrangement
The moment you decide to arrange these pickled vegetables beautifully is the moment you stop making a side dish and start creating an experience. I learned this from watching that vendor in Portland arrange her jars like she was curating a gallery. Think about color flow and rhythm—the deep burgundy of red cabbage next to the bright green of beans, the coral of carrots balancing the pale crunch of cauliflower. When you set this on the table, you're not just feeding people; you're giving them permission to pause, to look, to appreciate the work of your hands and the patience of time. That matters more than you might think.
Flavor Combinations That Changed Everything
Once you understand how the basic pickling formula works—acid, salt, sugar, time—you realize you can pickle almost anything. But it wasn't until I started experimenting with different aromatics that the dish truly came alive. I tried apple cider vinegar once and the whole thing tasted like autumn. I added lemon zest to the brine and suddenly it felt Mediterranean and bright. I even tried a splash of soy sauce in the brine (it works, surprisingly), and it brought an umami depth I didn't expect. The vegetables are the canvas, but the spices and aromatics are what make the painting sing. Give yourself permission to experiment, to fail, to adjust. That's where the magic lives.
Beyond the Pickle: How to Use These Vegetables
Here's something nobody tells you about homemade pickles: they're not just for snacking. I've crumbled pickled vegetables into grain bowls and suddenly the whole thing felt intentional and complete. I've added them to sandwiches and tacos and suddenly everything tasted brighter. I've even stirred them into cream cheese for an unexpected appetizer. The brine itself—don't pour it down the sink. It's liquid gold. Use it to dress greens, to deglaze a pan, to marinate proteins, to add depth to soups. Nothing is wasted when you pickle with intention. Plus, the longer the vegetables sit in the refrigerator, the more flavorful they become, so this is a dish that gets better with time in a way few things do.
- Toss pickled vegetables into salads for instant complexity and brightness
- Layer them into sandwiches and wraps to add crunch and tang
- Serve them alongside cheese boards or charcuterie spreads for a palate-cleansing contrast
 Save Pin
 There's something deeply satisfying about opening your refrigerator and seeing those jars lined up like little jeweled treasures—proof that you made something good with your own hands. I hope this becomes a ritual for you too, the way it has for me.
Recipe FAQs
- → What vegetables work best for pickling and fermentation?
Crunchy, firm vegetables like carrots, cucumbers, radishes, cabbage, cauliflower, and green beans hold up well and develop great texture during pickling or fermentation.
- → How long should the vegetables ferment for optimal flavor?
Quick pickling requires at least 12 hours chilling, while fermentation can take 5–7 days at room temperature to deepen flavors and complexity.
- → Can I adjust the spice level of the pickled mix?
Yes, including or omitting chili slices adjusts the heat, and you can customize spices like mustard seeds, coriander, and peppercorns to taste.
- → How should I store pickled and fermented vegetables?
Keep jars sealed in the refrigerator for quick pickles or at room temperature for fermentation, ensuring vegetables stay submerged in brine to prevent spoilage.
- → Are there any suitable pairings for this vegetable feast?
This flavorful vegetable assortment complements crusty breads, vegan cheeses, cured meats, and pairs nicely with crisp white wines like Riesling or dry rosé.